Jeneverbessen / WILD FOOD FOR FREE

Jeneverbessen


Jeneverbessen worden ook damberen of deemberen genoemd. De plant komt voor in Europa, Noordwest Afrika en Azië. Ook in Nederland groeit de jeneverbes. U vindt haar voornamelijk op heide en zandverstuivingen. De jeneverbes kan op kalkrijke grond uitgroeien tot een boom van 10 meter hoog. In bergachtige streken of op veengrond past de jeneverbes zich aan en blijft ze klein en struikvormig. U mag haar niet plukken want de plant staat op de lijst van beschermde planten. Door het vrijwel ontbreken van verjonging in de afgelopen 60 jaar dreigt de Jeneverbes te verdwijnen. De reden hiervan is nog steeds niet bekend. Ook de bessen mag u niet plukken. 


Vroeger werd de jeneverbes gezien als een magisch kruid dat bescherming bood tegen duivels, kwade geesten en wilde dieren. Tegenwoordig wordt de jeneverbes nog steeds gebruikt in geneesmiddelen tegen waterzucht, chronische blaasproblemen, nierstenen en als urineafdrijvend middel. De jeneverbes heeft een uitgesproken aromatische geur. De bessen rijpen pas 3 jaar na de bloei. Behalve de bessen van de cederhoutboom, die zijn al na een jaar rijp. De bessen hebben een doorsnee van 5 tot 6 millimeter. Ze zijn eerst groen van kleur en worden naar mate ze rijper worden blauwzwart van kleur. In de herfst van september tot oktober zijn de bessen rijp. Ze worden in de zon gedroogd. 


Jeneverbessen worden bijna altijd gedroogd gebruikt. U vindt ze gedroogd in de supermarkt. Ze smaken zoetig, geurig en wat harsachtig. De smaak van de bessen kan wisselen van sterkte. Hoe zuidelijker ze groeien, hoe meer etherische oliën ze bevatten en des te krachtiger de smaak zal zijn. De smaak van bessen uit Italië smaken daarom twee keer zo sterk als de bessen uit Nederland. Wanneer u de bessen voor gebruik kneust, komt dat de smaak van de jeneverbes ten goede. U bewaart de gedroogde bessen in een afgesloten pot op een droge donkere plaats. Ze zijn tot een jaar houdbaar.


Ecologie
De jeneverbes is de enige boomsoort in Nederland die op de Nederlandse Rode lijst van planten staat als algemeen voorkomend, maar sterk in aantal afgenomen. De jeneverbes is een in Nederland wettelijk beschermde boom. Een groot deel van de Nederlandse exemplaren groeien op de Veluwe en in Drenthe. De Drentse naam is 'iberen' of 'damberen'. Er is een restpopulatie in Limburg. Voor het voortbestaan van de jeneverbes is het belangrijk dat er voldoende exemplaren in de buurt staan en dat ze vrij staan; de wind moet met name tijdens de bloei vrij spel hebben. Dit om het zogenaamderoken van de bomen te waarborgen. De plant verspreid namelijk tijdens de bloei wolken van stuifmeel. De grote lijster eet de kegelbessen en verspreidt op deze wijze de zaden.
Jeneverbes komt in Nederland voor op arme zandverstuivings- en heidelandschappen. Er vindt op het ogenblik weinig tot geen natuurlijke verjonging plaats. Een uitzondering zijn de terreinen van het Nederlandse Ministerie van Defensie waar de bodem regelmatig wordt verstoord. De Jeneverbes is een pionierssoort waarvan de zaden kiemen in minerale bodems (lees: stuifzanden) na enkele natte jaren [2]. Mogelijke verklaringen voor de beperkte verjonging zijn (1) konijnenvraat van jonge scheuten en (2) een te zure samenstelling van de bodem.
Grote populaties komen voor in de naaldwouden van Azië en Canada. Het verspreidingsgebied is zeer groot: vrijwel overal op het noordelijk halfrond tot langs de poolcirkel met uitlopers tot diep in de subtropische gebieden.


Voorkomen:
In Nederland worden tegenwoordig Jeneverbessen in de meeste gevallen als solitaire struiken aangetroffen. Zeldzaam zijn de jeneverbessenbossen waarbij men diverse exemplaren vlakbij elkaar aantreft. Op de Veluwe langs de weg van Otterlo naar Schaarsbergen ligt een jeneverbessenbos. Het bos ligt gedeeltelijk in het Nationaal Park De Hoge Veluwe. Het is een unieke plaats, omdat de jeneverbessen hier dicht bij elkaar staan.


Enkele plekken waar deze nog te vinden zijn:


PSYCHOLOGY OF SURVIVAL

It takes much more than the knowledge and skills to build shelters, get food, make fires, and travel without the aid of standard navigational devices to live successfully through a survival situation. Some people with little or no survival training have managed to survive life-threatening circumstances. Some people with survival training have not used their skills and died. A key ingredient in any survival situation is the mental attitude of the individual(s) involved. Having survival skills is important; having the will to survive is essential. Without a desk to survive, acquired skills serve little purpose and invaluable knowledge goes to waste.
There is a psychology to survival. The soldier in a survival environment faces many stresses that ultimately impact on his mind. These stresses can produce thoughts and emotions that, if poorly understood, can transform a confident, well-trained soldier into an indecisive, ineffective individual with questionable ability to survive. Thus, every soldier must be aware of and be able to recognize those stresses commonly associated with survival. Additionally, it is imperative that soldiers be aware of their reactions to the wide variety of stresses associated with survival. This chapter will identify and explain the nature of stress, the stresses of survival, and those internal reactions soldiers will naturally experience when faced with the stresses of a real-world survival situation. The knowledge you, the soldier, gain from this chapter and other chapters in this manual, will prepare you to come through the toughest times alive.

TRAPS AND SNARES

TRAPS AND SNARES

For an unarmed survivor or evader, or when the sound of a rifle shot could be a problem, trapping or snaring wild game is a good alternative. Several well-placed traps have the potential to catch much more game than a man with a rifle is likely to shoot. To be effective with any type of trap or snare, you must--
  • Be familiar with the species of animal you intend to catch.
  • Be capable of constructing a proper trap.
  • Not alarm the prey by leaving signs of your presence.
There are no catchall traps you can set for all animals. You must determine what species are in a given area and set your traps specifically with those animals in mind. Look for the following:
  • Runs and trails.
  • Tracks.
  • Droppings.
  • Chewed or rubbed vegetation.
  • Nesting or roosting sites.
  • Feeding and watering areas.
Position your traps and snares where there is proof that animals pass through. You must determine if it is a "run" or a "trail." A trail will show signs of use by several species and will be rather distinct. A run is usually smaller and less distinct and will only contain signs of one species. You may construct a perfect snare, but it will not catch anything if haphazardly placed in the woods. Animals have bedding areas, waterholes, and feeding areas with trails leading from one to another. You must place snares and traps around these areas to be effective.
For an evader in a hostile environment, trap and snare concealment is important. It is equally important, however, not to create a disturbance that will alarm the animal and cause it to avoid the trap. Therefore, if you must dig, remove all fresh dirt from the area. Most animals will instinctively avoid a pitfall-type trap. Prepare the various parts of a trap or snare away from the site, carry them in, and set them up. Such actions make it easier to avoid disturbing the local vegetation, thereby alerting the prey. Do not use freshly cut, live vegetation to construct a trap or snare. Freshly cut vegetation will "bleed" sap that has an odor the prey will be able to smell. It is an alarm signal to the animal.
You must remove or mask the human scent on and around the trap you set. Although birds do not have a developed sense of smell, nearly all mammals depend on smell even more than on sight. Even the slightest human scent on a trap will alarm the prey and cause it to avoid the area. Actually removing the scent from a trap is difficult but masking it is relatively easy. Use the fluid from the gall and urine bladders of previous kills. Do not use human urine. Mud, particularly from an area with plenty of rotting vegetation, is also good. Use it to coat your hands when handling the trap and to coat the trap when setting it. In nearly all parts of the world, animals know the smell of burned vegetation and smoke. It is only when a fire is actually burning that they become alarmed. Therefore, smoking the trap parts is an effective means to mask your scent. If one of the above techniques is not practical, and if time permits, allow a trap to weather for a few days and then set it. Do not handle a trap while it is weathering. When you position the trap, camouflage it as naturally as possible to prevent detection by the enemy and to avoid alarming the prey.
Traps or snares placed on a trail or run should use channelization. To build a channel, construct a funnel-shaped barrier extending from the sides of the trail toward the trap, with the narrowest part nearest the trap. Channelization should be inconspicuous to avoid alerting the prey. As the animal gets to the trap, it cannot turn left or right and continues into the trap. Few wild animals will back up, preferring to face the direction of travel. Channelization does not have to be an impassable barrier. You only have to make it inconvenient for the animal to go over or through the barrier. For best effect, the channelization should reduce the trail's width to just slightly wider than the targeted animal's body. Maintain this constriction at least as far back from the trap as the animal's body length, then begin the widening toward the mouth of the funnel.

Use of Bait

Baiting a trap or snare increases your chances of catching an animal. When catching fish, you must bait nearly all the devices. Success with an unbaited trap depends on its placement in a good location. A baited trap can actually draw animals to it. The bait should be something the animal knows. This bait, however, should not be so readily available in the immediate area that the animal can get it close by. For example, baiting a trap with corn in the middle of a corn field would not be likely to work. Likewise, if corn is not grown in the region, a corn-baited trap may arouse an animal's curiosity and keep it alerted while it ponders the strange food. Under such circumstances it may not go for the bait. One bait that works well on small mammals is the peanut butter from a meal, ready-to-eat (MRE) ration. Salt is also a good bait. When using such baits, scatter bits of it around the trap to give the prey a chance to sample it and develop a craving for it. The animal will then overcome some of its caution b efore it gets to the trap.
If you set and bait a trap for one species but another species takes the bait without being caught, try to determine what the animal was. Then set a proper trap for that animal, using the same bait.
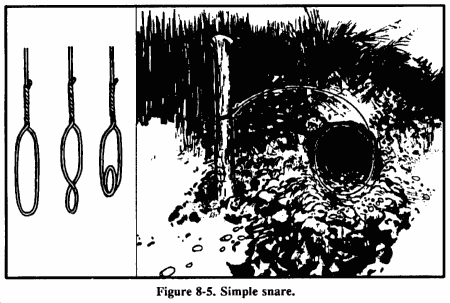
Note: Once you have successfully trapped an animal, you will not only gain confidence in your ability, you also will have resupplied yourself with bait for several more traps.

Trap and Snare Construction

Traps and snares crush, choke, hang, or entangle the prey. A single trap or snare will commonly incorporate two or more of these principles. The mechanisms that provide power to the trap are almost always very simple. The struggling victim, the force of gravity, or a bent sapling's tension provides the power.
The heart of any trap or snare is the trigger. When planning a trap or snare, ask yourself how it should affect the prey, what is the source of power, and what will be the most efficient trigger. Your answers will help you devise a specific trap for a specific species. Traps are designed to catch and hold or to catch and kill. Snares are traps that incorporate a noose to accomplish either function.

Simple Snare

A simple snare (Figure 8-5) consists of a noose placed over a trail or den hole and attached to a firmly planted stake. If the noose is some type of cordage placed upright on a game trail, use small twigs or blades of grass to hold it up. Filaments from spider webs are excellent for holding nooses open. Make sure the noose is large enough to pass freely over the animal's head. As the animal continues to move, the noose tightens around its neck. The more the animal struggles, the tighter the noose gets. This type of snare usually does not kill the animal. If you use cordage, it may loosen enough to slip off the animal's neck. Wire is therefore the best choice for a simple snare.

Drag Noose

Use a drag noose on an animal run (Figure 8-6). Place forked sticks on either side of the run and lay a sturdy crossmember across them. Tie the noose to the crossmember and hang it at a height above the animal's head. (Nooses designed to catch by the head should never be low enough for the prey to step into with a foot.) As the noose tightens around the animal's neck, the animal pulls the crossmember from the forked sticks and drags it along. The surrounding vegetation quickly catches the crossmember and the animal becomes entangled.

Twitch-Up

A twitch-up is a supple sapling, which, when bent over and secured with a triggering device, will provide power to a variety of snares. Select a hardwood sapling along the trail. A twitch-up will work much faster and with more force if you remove all the branches and foliage.

Twitch-Up Snare

A simple twitch-up snare uses two forked sticks, each with a long and short leg (Figure 8-7). Bend the twitch-up and mark the trail below it. Drive the long leg of one forked stick firmly into the ground at that point. Ensure the cut on the short leg of this stick is parallel to the ground. Tie the long leg of the remaining forked stick to a piece of cordage secured to the twitch-up. Cut the short leg so that it catches on the short leg of the other forked stick. Extend a noose over the trail. Set the trap by bending the twitch-up and engaging the short legs of the forked sticks. When an animal catches its head in the noose, it pulls the forked sticks apart, allowing the twitch-up to spring up and hang the prey.
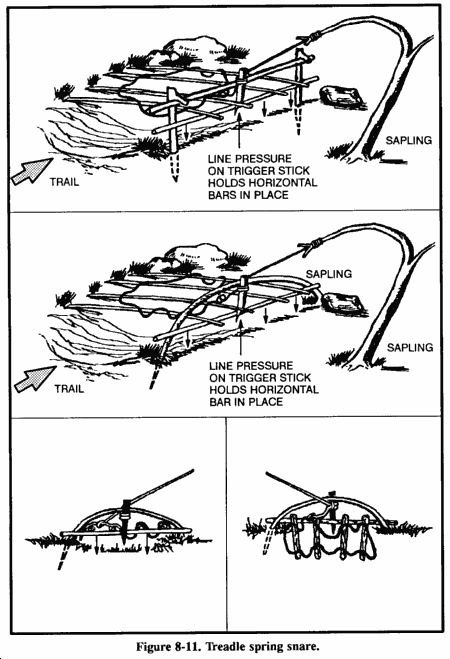
Note: Do not use green sticks for the trigger. The sap that oozes out could glue them together.

Squirrel Pole

A squirrel pole is a long pole placed against a tree in an area showing a lot of squirrel activity (Figure 8-8). Place several wire nooses along the top and sides of the pole so that a squirrel trying to go up or down the pole will have to pass through one or more of them. Position the nooses (5 to 6 centimeters in diameter) about 2.5 centimeters off the pole. Place the top and bottom wire nooses 45 centimeters from the top and bottom of the pole to prevent the squirrel from getting its feet on a solid surface. If this happens, the squirrel will chew through the wire. Squirrels are naturally curious. After an initial period of caution, they will try to go up or down the pole and will get caught in a noose. The struggling animal will soon fall from the pole and strangle. Other squirrels will soon follow and, in this way, you can catch several squirrels. You can emplace multiple poles to increase the catch.

Ojibwa Bird Pole

An Ojibwa bird pole is a snare used by native Americans for centuries (Figure 8-9). To be effective, place it in a relatively open area away from tall trees. For best results, pick a spot near feeding areas, dusting areas, or watering holes. Cut a pole 1.8 to 2.1 meters long and trim away all limbs and foliage. Do not use resinous wood such as pine. Sharpen the upper end to a point, then drill a small diameter hole 5 to 7.5 centimeters down from the top. Cut a small stick 10 to 15 centimeters long and shape one end so that it will almost fit into the hole. This is the perch. Plant the long pole in the ground with the pointed end up. Tie a small weight, about equal to the weight of the targeted species, to a length of cordage. Pass the free end of the cordage through the hole, and tie a slip noose that covers the perch. Tie a single overhand knot in the cordage and place the perch against the hole. Allow the cordage to slip through the hole until the overhand knot rests against the pole and the top of the perch. The tension of the overhand knot against the pole and perch will hold the perch in position. Spread the noose over the perch, ensuring it covers the perch and drapes over on both sides. Most birds prefer to rest on something above ground and will land on the perch. As soon as the bird lands, the perch will fall, releasing the over-hand knot and allowing the weight to drop. The noose will tighten around the bird's feet, capturing it. If the weight is too heavy, it will cut the bird's feet off, allowing it to escape.

Noosing Wand

A noose stick or "noosing wand" is useful for capturing roosting birds or small mammals (Figure 8-10). It requires a patient operator. This wand is more a weapon than a trap. It consists of a pole (as long as you can effectively handle) with a slip noose of wire or stiff cordage at the small end. To catch an animal, you slip the noose over the neck of a roosting bird and pull it tight. You can also place it over a den hole and hide in a nearby blind. When the animal emerges from the den, you jerk the pole to tighten the noose and thus capture the animal. Carry a stout club to kill the prey.

Treadle Spring Snare

Use a treadle snare against small game on a trail (Figure 8-11). Dig a shallow hole in the trail. Then drive a forked stick (fork down) into the ground on each side of the hole on the same side of the trail. Select two fairly straight sticks that span the two forks. Position these two sticks so that their ends engage the forks. Place several sticks over the hole in the trail by positioning one end over the lower horizontal stick and the other on the ground on the other side of the hole. Cover the hole with enough sticks so that the prey must step on at least one of them to set off the snare. Tie one end of a piece of cordage to a twitch-up or to a weight suspended over a tree limb. Bend the twitch-up or raise the suspended weight to determine where You will tie a 5 centimeter or so long trigger. Form a noose with the other end of the cordage. Route and spread the noose over the top of the sticks over the hole. Place the trigger stick against the horizontal sticks and route the co rdage behind the sticks so that the tension of the power source will hold it in place. Adjust the bottom horizontal stick so that it will barely hold against the trigger. A the animal places its foot on a stick across the hole, the bottom horizontal stick moves down, releasing the trigger and allowing the noose to catch the animal by the foot. Because of the disturbance on the trail, an animal will be wary. You must therefore use channelization.

Figure 4 Deadfall

The figure 4 is a trigger used to drop a weight onto a prey and crush it (Figure 8-12). The type of weight used may vary, but it should be heavy enough to kill or incapacitate the prey immediately. Construct the figure 4 using three notched sticks. These notches hold the sticks together in a figure 4 pattern when under tension. Practice making this trigger before-hand; it requires close tolerances and precise angles in its construction.

Paiute Deadfall

The Paiute deadfall is similar to the figure 4 but uses a piece of cordage and a catch stick (Figure 8-13). It has the advantage of being easier to set than the figure 4. Tie one end of a piece of cordage to the lower end of the diagonal stick. Tie the other end of the cordage to another stick about 5 centimeters long. This 5-centimeter stick is the catch stick. Bring the cord halfway around the vertical stick with the catch stick at a 90-degree angle. Place the bait stick with one end against the drop weight, or a peg driven into the ground, and the other against the catch stick. When a prey disturbs the bait stick, it falls free, releasing the catch stick. As the diagonal stick flies up, the weight falls, crushing the prey.

Bow Trap

A bow trap is one of the deadliest traps. It is dangerous to man as well as animals (Figure 8-14). To construct this trap, build a bow and anchor it to the ground with pegs. Adjust the aiming point as you anchor the bow. Lash a toggle stick to the trigger stick. Two upright sticks driven into the ground hold the trigger stick in place at a point where the toggle stick will engage the pulled bow string. Place a catch stick between the toggle stick and a stake driven into the ground. Tie a trip wire or cordage to the catch stick and route it around stakes and across the game trail where you tie it off (as in Figure 8-14). When the prey trips the trip wire, the bow looses an arrow into it. A notch in the bow serves to help aim the arrow.


WARNING
This is a lethal trap. Approach it with caution and from the rear only!

Pig Spear Shaft

To construct the pig spear shaft, select a stout pole about 2.5 meters long (Figure 8-15). At the smaller end, firmly lash several small stakes. Lash the large end tightly to a tree along the game trail. Tie a length of cordage to another tree across the trail. Tie a sturdy, smooth stick to the other end of the cord. From the first tree, tie a trip wire or cord low to the ground, stretch it across the trail, and tie it to a catch stick. Make a slip ring from vines or other suitable material. Encircle the trip wire and the smooth stick with the slip ring. Emplace one end of another smooth stick within the slip ring and its other end against the second tree. Pull the smaller end of the spear shaft across the trail and position it between the short cord and the smooth stick. As the animal trips the trip wire, the catch stick pulls the slip ring off the smooth sticks, releasing the spear shaft that springs across the trail and impales the prey against the tree.


WARNING
This is a lethal trap. Approach it with caution!

Bottle Trap

A bottle trap is a simple trap for mice and voles (Figure 8-16). Dig a hole 30 to 45 centimeters deep that is wider at the bottom than at the top. Make the top of the hole as small as possible. Place a piece of bark or wood over the hole with small stones under it to hold it up 2.5 to 5 centimeters off the ground. Mice or voles will hide under the cover to escape danger and fall into the hole. They cannot climb out because of the wall's backward slope. Use caution when checking this trap; it is an excellent hiding place for snakes.

How the winter cold affects you


A normal, naked human body functions best when the air temperature is 27°C. One way of defining the word “cold”, then, is any temperature below 27°C. Below this temperature we need to be proactive, whether by adding clothes for protection, going inside or moving around to raise our blood circulation. Wind and rain dilute our perception of the cold.
There is a saying in Greenland that “if you sweat, you die”. This might be a little drastic, but it illustrates a point - when moisture enters the picture, frostbite often becomes an issue, even at temperatures above 0°C. Water conducts heat 25-30 times better than air and rapidly transports energy away from the body. (Air, on the other hand, is a poor heat conductor and provides insulation – a characteristic that sweaters, down jackets, sleeping bags, etc., make the most of.) This is why sweat, snow and water are actually a threat to your well-being, particularly if you are on a long trek and are unable to dry your clothes and equipment at the end of the day.

Wind and wind chill

When the wind is not blowing and you are standing relatively still, the air around your body warms up and acts as a layer of insulation. If the wind starts to blow, this warm air is pushed away by new, cold air. Your body reacts by once again warming up the air around you. If this continues for a long period of time, your body temperature will drop.
The more the wind blows, the cooler you become. At a temperature of –15°C and winds of 8 metres/second, the wind chill factor on your bare skin is the same as wind-still conditions at –34°C. This relationship between the wind, temperature and effective temperature on your bare skin is illustrated by the wind chill index below.
 
Wind m/sec
Air temperature °C
0
0
5
10
15
20
25
30
35
40
2
1
6
11
16
21
27
32
37
42
5
9
15
21
28
34
40
47
53
59
8
13
20
27
34
41
48
55
62
69
16
18
26
34
42
49
57
65
73
80
25
20
28
36
44
52
60
69
77
85
The wind chill index shows the effective temperature on bare skin at different wind speeds

Winter conditions


From a pure meteorological perspective, the definition of winter is when the average temperature over a 24-hour period is below 0°C. Cold, winter-like conditions can occur at any time during the year, particular at high altitudes. However, if we ignore this theoretical definition of winter, a common, but more relaxed, definition of winter is the arrival of both snow – as well as the advantages and disadvantages snow brings – and cold temperatures. But winter does not necessarily mean temperatures in the extreme minus; rapidly changing weather often causes problems when temperatures fall and wet conditions freeze. This type of variation at relatively mild temperatures can actually be more difficult to handle than persistent, extremely low temperatures.

Snow - both friend and foe

Snow often makes it easier to move through nature since you can glide on skis or pull equipment on a sledge. You can melt snow for drinking or dig a bivouac or hole to wait out bad weather. But snow can also test your ability to navigate since snow-covered contours and landmarks take on a different appearance than when they are bare. Heavy snow can quickly eliminate all visibility, and snow that drifts up the sides of mountains can, if the wind is strong enough, quickly turn into a potential avalanche.
In order to enjoy your experience, you need to know some basics about how to adapt to the snow. The follow-up question, naturally, is then “So, what do I do?”. One of the primary things you need to do is let go of some of the mental blocks and preconceptions that you may have and focus directly on the uncertainty that affects how you react to the cold. This means you should spend a lot of time outdoors in order to gradually discover what winter is like and how beautiful it can be. When Mother Nature then unleashes one of her disagreeable outbursts, you will be better prepared mentally and will be able to make smarter decisions. You will also be able to tackle the challenges winter throws at you, and you will find it easier to “dig deep” in more difficult moments.
In short, there is a long list of reasons why you should prepare for a winter trek differently than you would for a summer trek. But with the right preparations and equipment, almost anyone can learn to handle the cold – and therefore also safely appreciate its beauty.

Prepare yourself physically


A long mountain trek requires that you prepare yourself both physically and mentally. Regardless of how many days you have planned to hike, you will expose yourself to stresses that you rarely experience during your normal daily schedule. You leg muscles, feet and willpower will be tested and the more prepared you are the more you will enjoy the gurgling brooks and dramatic mountain tops.


1) Start early

Your general fitness level is important for long hikes where you are carrying your lodging. Your heart and lungs are going to have to work hard, which means that you need to be in relatively good shape to be able to enjoy the nature. If you are not physically active year-round, you should start training no later than six months before you go on a long trek. Hiking, biking, running and swimming are all good activities to build up your fitness level.


2) Trekking in mountainous terrain

Your leg muscles, knees, feet and joints will be exposed to extreme stress. In order to help your body become accustomed to these stresses, you should try to create the same conditions as your adventure. Hike in stony terrain and up and down hills or mountains. Try to take a long walk at least once a week.


3) Get used to a backpack

Carrying a heavy backpack can feel uncomfortable at first. It weighs down on your shoulders and hips and your steps become heavier. But if you start with a lighter pack and slowly increase the weight, your body will get used to the load. Slowly add to the pack until you reach the weight you will carry during your trek. You do not want to shock your body - this can lead to serious injury.


4) Break in your hiking boots

Make sure you have broken in your hiking boots before you go on your trek. There is nothing worse than having to cut a trip short due to blisters. To be really sure that your boots fit well, we recommend that you walk at least 200 kilometres in them before going on a long trek.


5) Don't overtrain

Hiking in the Swedish mountains is difficult but it is not like climbing Mount Everest - it is important that you do not overtrain. Before the trek, you should eat healthily, get plenty of sleep and not train so hard that your muscles and joints become sore. The objective should be to start your trip with a rested, strong body.