Wandelen Jotunheimen Noorwegen

Wandelen Jotunheimen Noorwegen


Korte feiten over wandelen in Jotunheimen

Gebied: Jotunheimen (Zuid-Noorwegen) is het hoogste gebergte van Noorwegen.Tocht(en): Besseggen graatwandeling en beklimming Galdhøpiggen (2469 m), de twee populairste wandelingen van Noorwegen.Navigeren: Markering + wandelkaart.Beste seizoen: Midden juni tot midden september.Overnachten: Berghutten. Wildkamperen kan ook.

Gedetailleerde informatie
Over JotunheimenJotunheimen (Zuid-Noorwegen, drie uur rijden boven Oslo) is het hoogste gebergte van Noorwegen. Hier vind je de meeste toppen boven de 2000 meter van Noord-Europa. Het gebied is woest, rotsig en stil (buiten het hoogseizoen kom je er bijna niemand tegen). Jotunheimen (letterlijk huis van de reuzen) is een nationaal park. Je vindt hier de mooiste flora van Noorwegen en als je geluk hebt, kun je hier de veelvraat, lynx en eland spotten.

De twee tochten: 

Besseggen graat + beklimming Galdhøpiggen 
Besseggen:You’ll never walk aloneDuur: 6-7 uur
Moeilijkheidsgraad: gemiddeld, stijging 760 m.  De graat is steil en vergt enig klauterwerk, ook moet je geen last van hoogtevrees hebben.
Galdhøpiggen (2469 m): Het dak van Noord-EuropaDuur: 6 uur
Moeilijkheidsgraad: gemiddeld (met gids over gletsjer, 600 m stijgen)
Besseggen en Galdhøpiggen zijn de populairste wandelingen van Noorwegen. Vooral op de Besseggen graat wil het wel eens druk zijn. In Jotunheimen zijn genoeg ‘stillere’ alternatieven.
Alternatief Besseggen: Bukkelaegret. De tocht is 10 km lang, duurt ongeveer 5 tot 6 uur, kent een stijging van 400 m en heeft een pittige afdaling op het eind (als je loopt vanuit Memurubu richting Gjendebu). De uitzichten zijn, eerlijk is eerlijk, minder spectaculair, maar je kunt er wel in je eentje van genieten. Meer informatie vind je bij Den Norske Turistforening (DNT), www.turistforeningen.no.
Alternatief  Galdhøpiggen: start vanuit de hut Spiterstulen (9 uur heen en terug, stijging 1400m). Lange, maar prachtige klim over hoofdzakelijk steen- en rotsvelden. Onder de top enkele sneeuwvelden, maar je kunt in goed weer zonder gids omhoog. Onderweg pak je ook nog de toppen mee van de Svellnosi (2272m) en Keilhaus (2355m). Meer informatie via www.spiterstulen.no.
NavigerenZowel de Besseggen als Galdhøpiggen zijn voorzien van de rode ‘T’, uitgezet door Den Norske Turistforening , DNT. Toch is het altijd raadzaam om een goede kaart bij je te hebben in dit gebied, zie ook Kaarten en gidsen.
Beste seizoen en geld
Het ‘wandelseizoen’ in Jotunheimen loopt van midden juni tot midden september. Ook de hutten hanteren deze openingsmaanden. In Noorwegen betaal je met de Noorse Kroon, 1 nkr = € 0,13 (info dateert van februari 2013).
OvernachtenDe meeste mensen die aankomen bij Besseggen slapen de eerste nacht inGjendesheim, het vlaggenschip van de DNT hutten (gjendesheim.turistforeningen.no) aan het Gjendemeer. Wij zijn daarna per boot naar Memerubu gevaren (kijk voor vaarschema en prijzen op www.gjende.no) en maakten vanuit daar de dagtocht over Bukkelaegret (zonder onze bagage) om weer per boot vanuit Gjendebu terug te varen naar Memerubu(www.memurubu.no, geen DNT hut). Maar je kunt natuurlijk ook kiezen voor een overnachting in Gjendebu (www.gjendebu.com). Prijzen en slaapmogelijkheden van de DNT hutten zijn te vinden via www.turistforeningen.no
Voor de beklimming van de Galdhøpiggen sliepen wij in Spiterstulen(www.spiterstulen.no), 2- pk vanaf € 45 per persoon per nacht (excl ontbijt).
Wildkamperen kan natuurlijk ook (ook bij de verschillende hutten).
Vervoer naar Jotunheimen
Auto
: Jotunheimen (Gjendesheim berghut) ligt op 1655 km van Utrecht. Je kunt met de boot over vanuit Kiel of Frederikshaven (bijvoorbeeld met Stena Linewww.stenaline.nl of Colorline, www.colorline.com)Vliegtuig – KLM  vliegt dagelijks op Oslo (retour vanaf € 146), lowcoster Norwegian air vliegt 6 x per week tussen Amsterdam en Oslo (direct of via Kopenhagen), retour vanaf € 100Bus en trein – vanuit Oslo rijden er meerder malen per dag bussen en treinen richting Otta. Vanuit daar kun je met regionale bussen naar Gjendesheim rijden. Express bus Oslo, www.nor-way.no. Trein (mooie rit en comfortabel, stopt ook bij vliegveld Oslo), www.nsb.no. Retour vanaf € 130, soms goede aanbiedingen afhankelijk van seizoen. Regionale bussen naar plaatsen in berggebieden (eind juni tot eind augustus), www.jvb.no.
Meer informatie vind je op www.visitnorway.com
Kaarten en gidsenOm te wandelen is de Cappelens Kart CK 45 Jotunheimen een goede reisgenoot (verkrijgbaar ter plekke, € 29,50). Anders is Statens Turkart Jotunheimen (€ 22, 95) ook een betrouwbare metgezel. Voor meerdaagse tochten is Outdoor, Der Weg ist das Ziel, Norwegen (Duitstalig, € 13, 90) een optie.
Nuttige sites*www.fjellnorway.com – uitgebreide informatie over regio in het hart van Noorwegen met onder andere Jotunheimen en Dovrefjell.
*www.visitnorway.nl/wandelen – zeer complete site waar je alles vindt wat je wilt weten over wandelen in Noorwegen
*www.visitjotunheimen.com – algemene site over Jotunheimen
*www.yr.no – uitstekende weersite voor Noorwegen
*http://www.besseggen.net/– alles wat je moet weten over de populairste wandeling van Noorwegen


Hilleberg Jannu

Hilleberg Jannu


My pick for all around durable winter tent is the Hilleberg Jannu. Why? This tent has more features than my iPhone. The Jannu was designed to be the ultimate, high-altitude mountaineering assult tent. However, don’t leave it at home if you are just going out for the weekend in the hills. Moreover, looking for a strong tarp tent? This might be just for you, as the whole inner shell can come out to give you a strong 3 pole tarp tent. (for those who don’t need a tent floor)

The Jannu was conceived as the "ultimate high altitude mountaineering assault tent". I have had the chance to use and test a Jannu several times in Sweden.
A recent trip to Norrbottens län in early spring involving a 9 hour drive and 4 mile walk-in, meant that by 3am it was definitely time to get some rest. This being where features like the inner tent and fly being linked together and both going up as one means you'll appreciate the ease of pitching. This design is not often seen on mountain tents and in nasty weather helps to keep the inner tent as dry as possible. Great for typically wet, conditions, or in situations when you need to get shelter as quickly as possible.
Short pole sleeves are combined with clips on the outside of the fly - simply slide the colour coded poles into the appropriate sleeve and clip the rest of the fly on. Pitching the Jannu is when you can really feel the quality of materials used. It's almost as if each component is lubricated with Swedish massage oil; everything slides into place so easily.
Stability of the overall structure is greatly improved by multiple guying points. The poles are on the outside of the fly and strategic guying points have an extended loop that you can wrap around the pole before guying out. This is a pretty nifty feature which definitely adds to overall stability in high winds.
Internal floor space is surprisingly good in a tent that weighs comparatively little. It's certainly more spacious than expected. At 235cm long the inner tent should give enough room for even the tallest user and the internal walls are all fairly steep so usable head room is well utilised. Width is also generous and 3 people could squeeze in if need be.
The total weight of 2.9kg is extremely good for such a stable and relatively spacious tent. 1.45kg each for a party of 2 even compares well with most standard 2 man tunnel tents. The Hilleberg Nallo 2, for example, would be 1.1kg each. The Jannu's design is significantly more stable that a tunnel shape, yet its weight is very low when compared to a traditional geodesic mountain tent.
Minimising condensation build-up means generous roof vents on the inner and the fly which can be closed. The vents are backed with mesh panels to prevent insects getting in and are protected from the elements by a ‘cap' of fabric over the roof. This ‘cap' has guys to add extra stability and extends to a lip over the front door, which stops water from dripping into the tent if the inner door is open for ventilation in bad weather.
The tent seemed to ventilate best when using the roof vents in conjunction with the main door venting. The flysheet does extend all the way to the ground which increases performance, but does limit airflow between the fly and the inner. I did experience some condensation inside the tent, but no more than should be expected in a mountain tent in average conditions.
Porch size is good - there's enough space for a couple of big packs and still room left to cook. Many people find a small porch and/or entrance to the rear to be a useful feature on a mountain tent, but the omission of one on the Jannu does save a little weight, which is fine by me.  The front door is actually asymmetric in shape - helping to keep one side sheltered depending on which way the wind is blowing. There are also multiple zips on the front door which makes getting in and out nice and easy.
As mentioned, with the total weight being 2.9kg, this makes the Jannu one of the lightest mountain tents out there. Both the Crux X2 Storm and Terra Nova Superlight Quasar are similar in terms of weight, but neither quite match the Jannu when it comes to internal space. Both the Crux and Terra Nova models have an extra pole on the Jannu, possibly adding a perceived advantage in stability. However, I think the extra guying points, combined with the Jannu's incredibly high quality of materials, create an equally taut and stable design.
In terms of the fabrics used, Hilleberg use two different types of materials for their flysheets; an ultra light Kerlon 1200 nylon and a heavier Kerlon 1800 nylon. With the Jannu they opted for the Kerlon 1200, which isn't quite as durable as the 1800, but significantly lighter. As the fly is silicon coated, the seams are not taped, but the silicon coating adds strength, water repellancy, and reduces sagging when the fly is wet.
Super strong and super light... the Hilleburg Jannu standing up to the storm.

Conclusion
Overall the Jannu is a brilliant tent that would work for anyone looking for a lightweight product that is suitable not just for alpine climbing and mountaineering, but also 4 season backpacking, in all conditions. In many ways I think the Jannu manages to combine the best properties of a tunnel tent, i.e. good space to weight ratio, with the best properties of a traditional mountain tent i.e. strength and stability. I think the Hilleberg Jannu might be the best combination of strength and light weight at 6.5 lbs, for a dome tent anyway.
Yes it's an expensive bit of kit, but for me the quality of craftsmanship combined with the performance and versatility it offers makes for an unbeatable combination.
Movie: Hilleberg Jannu - Pitching instruction


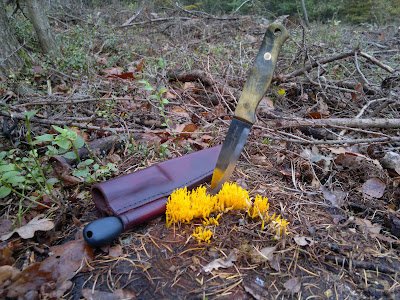
My knife: A Bernie Garland

My knife
Made by Bernie Garland in England
(woodlore)


How to Make Bark for Backpacking Meals & Snacks


How to Make Bark for Backpacking Meals & Snacks

What is Bark?
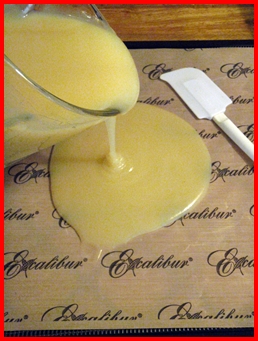
While working on food dehydrator recipes for mashed potatoes, I blended boiled potatoes and broth to a smoothie-like consistency and spread the mixture thinly on dehydrator trays. The potatoes dried into brittle sheets that easily broke into what I call, "Bark."
Potato Bark tasted pretty good as a ready-to-eat snack, especially Sweet Potato Bark, but with the addition of hot water, the Bark reconstituted back into mashed potatoes. I varied the flavor by blending the potatoes with vegetable, chicken, or beef broth.
One thing led to another, and soon I was blending and dehydrating other starchy foods like beans, creamed corn, pasta marinara, and 
pumpkin into Bark.
Why Bark?
  • When you cook and rehydrate Bark with other vegetables and meat, your backpacking meal turns into a thick stew with flavorful sauciness.


  • Because you make Bark from starchy foods high in complex carbohydrates, your hearty meal will power you up the next mountain with calories to spare.


  • Bark makes a great backpacking food because it weighs in at a couple of ounces per serving dry. Ten pounds of potatoes barks down to just eleven ounces.


  • If you run out of fuel or water, you can munch on Bark dry. Bark will reconstitute right in your mouth. Pumpkin Pie Bark goes in like a chip and down like pie!
Step-by-Step Food Dehydrator Recipes

Recipes with Tomato Sauce Leather


Recipes with Tomato Sauce Leather:

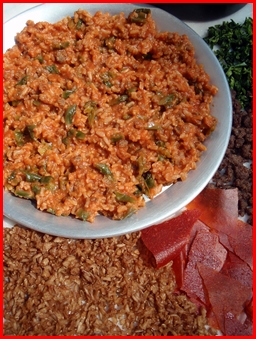
Unstuffed Peppers

Ingredients:
  • ½ Cup dried or instant rice
  • ¼ Cup ground beef, dried
  • ¼ Cup bell peppers, dried
  • ¼ Cup tomato sauce leather, tightly packed
  • 2 Tbsp parmesan cheese
  • 1¼ cups water
At Home:
Pack parmesan cheese and tomato sauce leather separately in small plastic bags. Enclose in a larger plastic bag with rice, ground beef, and peppers. 
On the Trail:
Combine all ingredients except parmesan cheese in pot with water and soak for five minutes.
Light stove, bring to a boil, and continue cooking with the lid on for one minute.
Remove pot from stove and wait ten minutes. Insulate pot if possible. Stir in parmesan cheese before serving.

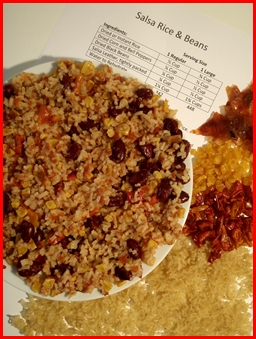
Salsa Rice & Beans

Ingredients:
  • ½ Cup dried or instant rice
  • ¼ Cup dried corn and bell peppers
  • ¼ Cup dried black or red beans
  • ¼ Cup salsa leather, tightly packed
  • 1¼ cups water
At Home:
Cook white or brown rice in vegetable or chicken broth and dehydrate; or use instant rice.

Run salsa through a blender and dry like tomato sauce into leather.

Try mixing green, red, and orange bell peppers for a colorful dish.

Meat Option: Add ¼ cup or more dried chicken and increase water to rehydrate by same amount.

Pack salsa leather separately in a small plastic bag. Enclose with all ingredients in plastic bag.
On the Trail:
Combine all ingredients in pot with water and soak for five minutes.
Light stove, bring to a boil, and continue cooking with the lid on for one minute.
Remove pot from stove and wait ten minutes. Insulate pot if possible.

Seafood Raminara

Ingredients:
  • ½ Cup ramen noodles (half package)
  • ¼ Cup dried shrimp and/or crabmeat
  • ¼ Cup dried vegetables – peppers, onions, mushrooms, tomatoes
  • ¼ Cup tomato sauce leather, tightly packed
  • 2 Tbsp parmesan cheese
  • 1 Cup water
At Home:
Break noodles into small pieces. Pack parmesan cheese and tomato sauce leather separately in small plastic bags. Enclose in a larger plastic bag with noodles, seafood, and vegetables. 
On the Trail:
Combine all ingredients except parmesan cheese with water in pot and soak for five minutes.
Light stove, bring to a boil, and continue cooking with the lid on for one minute.
Remove pot from stove and wait ten minutes. Insulate pot if possible. Stir in parmesan cheese before serving.

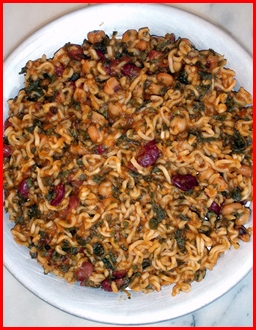
Spinach & Bean Raminara

Ingredients:
  • ½ Cup ramen noodles (half package)
  • ¼ Cup dried beans (any kind)
  • ¼ Cup dried spinach
  • ¼ Cup tomato sauce leather, tightly packed
  • 2 Tbsp parmesan cheese
  • 1 Cup water
At Home:
Cook beans from scratch or use canned beans. There is no need to cook canned beans before dehydrating. Simply drain and dehydrate at 125° for approximately six hours. Beans will split open when dried and will fall apart easily. You can use a single type of bean, such as white beans, or you can mix several different kinds together. 
Dehydrate spinach at 125° for approximately four hours until dry and crumbly. Spinach leaves can start flying around inside your dehydrator when they are almost dry. I cover mine with one of the mesh sheets from Excalibur Dehydrators.
Break noodles into small pieces. Pack parmesan cheese and tomato sauce leather separately in small plastic bags. Enclose in a larger plastic bag with noodles, spinach, and beans.
On the Trail:
Combine all ingredients except parmesan cheese with water in pot and soak for five minutes.
Light stove, bring to a boil, and continue cooking with the lid on for one minute.
Remove pot from stove and wait ten minutes. Insulate pot if possible. Stir in parmesan cheese before serving.

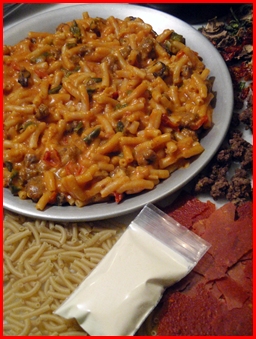
Macaroni with Cheesy Tomato Sauce

Ingredients:
  • ¼ Cup ground beef, dried
  • ¼ Cup mixed vegetables, dried (onions, peppers, mushrooms, tomotoes)
  • ½ Cup macaroni
  • ¼ Cup tomato sauce leather, tightly packed
  • 1 Tbsp + 1 tsp cheddar cheese powder
  • 1 Tbsp powdered milk
  • 1½ Cups water
At Home:
Combine cheese powder (from the mac & cheese box) and instant dry milk in a small plastic bag. Pack tomato sauce leather in another small plastic bag. Enclose the smaller bags in a larger bag with macaroni, ground beef, and vegetables. 
On the Trail:
Add all ingredients except the cheese/milk powders to your pot with 1½ cups water and soak for five minutes.
Light stove, bring to a boil, and continue cooking for two minutes.
Stir in cheese/milk powder, put the lid back on, and place pot into insulating cozy. Wait ten minutes for the meal to continue rehydrating and cooking. Buon Appetito!

Tomato Sauce Leather


Tomato Sauce Leather

Tomato sauce leather is my secret ingrediente italiano per deliziosi pasti. I use it to make Italian-style backpacking meals such as Unstuffed Peppers, Seafood Raminara, Spinach & Bean Raminara, and Macaroni with Cheesy Tomato Sauce.
Start with your grandma’s homemade tomato sauce recipe or buy a jar of Marinara Sauce. My favorite brand is Barilla® Spicy Marina. Run the tomato sauce through a blender to a smoothie-like consistency. Blending any chunks of tomatoes or other vegetables in the sauce thickens the sauce so it will make better leather. You will add back more dehydrated vegetables to these recipes later.
A little olive oil in the ingredients won't cause early spoilage, but avoid drying cheesy sauces like Vodka Sauce or Three-Cheese Sauce. The cheese adds fat which may shorten the shelf life of the leather. Cheesy sauces can be dried for short term use. The end product will feel greasier and more crumbly than cheese-less dried marinara sauce. A safer bet is to add cheddar cheese powder or parmesan cheese to the meal rather than to the leather.
Spread the sauce thinly on dehydrator trays covered with non-stick Paraflexx® sheets, parchment paper, or the fruit-roll sheets that came with your dehydrator. Don't use wax paper because the wax melts. I pour about eight fluid ounces onto each Excalibur Dehydrator tray and spread uniformly to the edges.
Dehydrate at 135° for six to eight hours or you may dry at 125° for eight to ten hours with equally good results. Drying times may vary depending on dehydrator model and humidity.
After about five hours, the sauce should be solidified enough for you to peel it off the trays and flip it over for the duration on the drying time. Remove the non-stick sheets during the latter drying stage so both sides of the leather are exposed to the hot air. If you start the drying process before going to bed or work, the leather will turn out fine if you don’t flip it. It just may take a little longer to dry and you can always flip and dry it for an hour or so to finish the job when you get to it. The finished product will be leathery and dry to the touch, not sticky.
Allow the leather to cool and then tear it into pieces. Store leather in a jar with a tight fitting lid until you are ready to pack it in plastic bags for a backpacking trip. I have packed sauce leather in mail drops for month-long hikes and it retained its full flavor and quality, although my daily rations were vacuum sealed. Leather which I have stored at home in jars in a cupboard was still in great shape when I ate it after six months. The color turns a little darker over time.
When combined with an equal part of hot water, leather will turn back into tomato sauce.
Salsa Leather
Blend and dry salsa the same way as tomato sauce. Create a tasty Mexican-style meal with rice, chicken and/or black beans, vegetables such as bell peppers and corn, and salsa leather.

Primus OmniLite Ti


Primus OmniLite Ti


Primus OmniLite TiDe OmniLite Ti is nieuwe lichtgewicht multifuel brander van Primus. Deze nieuwe brander is gebaseerd op de zeer succesvolle OmniFuel, welke wereldwijd vele awards heeft ontvangen. De OmniLite Ti is echter nog compacter en lichter van gewicht (341 gram inclusief pomp), maar brandt uiteraard ook op bijna alle soorten brandstof.

Zuinig koken

Hoewel de OmniLite Ti met een vermogen van 2600W zeer krachtig is, ligt de nadruk bij deze brander niet zo zeer op snel, maar juist efficiënt koken. Hoe zuiniger er om wordt gegaan met de brandstof, des te minder hoeft er te worden meegenomen tijdens en een tocht. En uiteraard is het ook beter voor het milieu als er minder bandstof verbruikt wordt. Het ontwerp van de OmniLite Ti is dan ook aangepast, zodat deze brander optimaal functioneert als hij gecombineerd wordt met de EtaPower pannen van Primus. Deze zijn uitgerust met een zogenaamde heat exchanger, welke de warmte zo efficiënt mogelijk verdeelt over de pan. Het bijgeleverde opvouwbare windscherm vergroot de efficiency van de brander door warmte-verlies nog verder te beperken.

Afstellen van de vlam gaat bijzonder makkelijkDe brander wordt geleverd inclusief fles en ErgopompPannen staan stabiel dankzij tandjes in de pandragersNaast vloeibare brandstoffen kan de OmniLite ook prima overweg met gas
Primus OmniLite Ti

Bijna alle soorten brandstof

Net als zijn illustere voorganger kan de OmniLite Ti overweg met een groot aantal verschillende soorten brandstof. Wasbenzine, gas, petroleum, ongelode benzine, diesel en kerosine kunnen allemaal gebruikt worden. Daardoor is de OmniLite zeer breed inzetbaar. Niet alleen is hij zeer geschikt voor korte tochten in de zomer waarbij een klein gasblikje voldoet, maar ook kan onder extreem koude temperaturen water aan de kook brengen door gebruik te maken van vloeibare brandstoffen.


Gebruiksgemak

Het afstellen van de vlam op de OmniLite Ti gaat zeer makkelijk dankzij een vlamregelaar die vlakbij de branderkop zit. Ook met handschoenen aan kan de brander goed afgesteld worden. Dankzij het lage zwaartepunt staan pannen direct goed stabiel op de brander. De pandragers, welke gemaakt zijn van titanium, zijn voorzien van een kartelrand. Zo blijven de pannen nog beter staan en is de kans op ongelukken tijdens het koken dus minimaal.

Compleet geleverd

Primus levert de OmniLite Ti als een complete set. Inclusief Ergopump™, vouwbaar windscherm, opberghoes, doorpriknaald en multi-tool. Tevens zit er een brandstoffles van 0,35 liter bij.

Advies verkoopprijs

De verkoopprijs van de Primus OmniLite Ti is EURO 219,95


Movie: Test Primus OmnuLite Ti

Movie: Primus OmniLite Ti Unboxing


Movie: Primus OmniLite Ti met Gas in Winter

Wild Stoves Wild Wood Gas Camp Stove MKII


Wild Stoves Wild Wood Gas Camp Stove MKII


Wild Stoves Wild Wood Gas Camp Stove MKIIHet principe van deze lichtgewicht houtverbrander is even vernuftig als eenvoudig: (brand)hout wordt dankzij voorverwarmde lucht op efficiënte wijze verbrand en geeft op die manier bijzonder veel warmte om je maaltijd te verwarmen.

Efficiënt en schoon

De Wood Gas Stove dankt zijn naam aan het feit dat het hout nagenoeg vergast wordt. Er zijn twee luchtstromen die ervoor zorgen dat het vuur zeer efficiënt brandt: de eerste van het hout zelf, de tweede ontstaat door de dubbele wand van het ontwerp. Daardoor wordt de eerste luchtstroom vermengd met voorverwarmde lucht, wat tot een veel efficiëntere (en schonere!) verbranding leidt. Daardoor heb je dus ook veel minder roetaanslag op je pannen, een probleem dat bij veel andere houtverbranders voor wel voorkomt.

Nooit zonder brandstof

Juist omdat de Wood Gas Camp Stove zo efficiënt brandt heeft hij ook genoeg aan weinig (vaste) brandstof. Een paar takjes om te beginnen en vervolgens aanvullen met voldoende brandstof om je maaltijd op te warmen. Denk daarbij niet alleen aan takjes, maar bijvoorbeeld ook dennenappels, hexamine (de bekende Esbit-blokjes) of zelfs kattenbakvulling. Bovendien is deze brander compatible met zowel de bekende Trangia branders (vloeistof) en de ultralichte White Box Stove. En omdat het om een passieve brander gaat (lees: er komt geen ventilator aan te pas) hoef je ook nooit bang te zijn dat je zonder batterijen komt te zitten halverwege een tocht.

Ingepakt is deze brander bijzonder compactDubbele luchtstroom zorgt voor meer efficiëntieGemaakt van hoogwaardig 304-grade roestvrij staalIn de nieuwe versie zijn de pannenhouders verbeterd
Wild Stoves Wild Wood Gas Camp Stove MKII

Stevig en stabiel, maar toch compact en lichtgewicht

De Wood Gas Camp Stove is behoorlijk stevig en stabiel. Het ontwerp is zo gemaakt dat ook grotere pannen zonder problemen stabiel op de brander kunnen staan. Ingepakt passen de onderdelen echter allemaal probleemloos in elkaar, waardoor een zeer compact en lichtgewicht pakketje ontstaat om mee te nemen op je tochten. Ingepakt is het pakketje slechts 6,6cm hoog en nog geen 14 cm breed en weegt het slechts 280 gram. Bijgeleverd is een handig opbergzakje om de brander (en eventueel brandstof) in op te bergen. De gehele brander is overigens gemaakt van 304-grade roestvrij staal.

Accessoires

Er zijn voor de Wood Gas Camp Stove ook enkele accessoires te koop overigens. Denk daarbij aan een compact windscherm om te zorgen dat er minder warmte verloren gaat tijdens het koken en bijvoorbeeld de al eerder genoemde White Box Stove, een alcoholbrander, welke perfect in de Wood Gas Camp Stove kan worden geplaatst. Uiteraard heb je in dat geval wel alcohol nodig als brandstof.

Advies verkoopprijs

De verkoopprijs van het Wild Stoves Wild Wood Gas Camp Stove MKII is EURO 67,50.

Movie: Wild Woodgas Camp Stove Mk II demo