Hilleberg Jannu

Hilleberg Jannu


My pick for all around durable winter tent is the Hilleberg Jannu. Why? This tent has more features than my iPhone. The Jannu was designed to be the ultimate, high-altitude mountaineering assult tent. However, don’t leave it at home if you are just going out for the weekend in the hills. Moreover, looking for a strong tarp tent? This might be just for you, as the whole inner shell can come out to give you a strong 3 pole tarp tent. (for those who don’t need a tent floor)

The Jannu was conceived as the "ultimate high altitude mountaineering assault tent". I have had the chance to use and test a Jannu several times in Sweden.
A recent trip to Norrbottens län in early spring involving a 9 hour drive and 4 mile walk-in, meant that by 3am it was definitely time to get some rest. This being where features like the inner tent and fly being linked together and both going up as one means you'll appreciate the ease of pitching. This design is not often seen on mountain tents and in nasty weather helps to keep the inner tent as dry as possible. Great for typically wet, conditions, or in situations when you need to get shelter as quickly as possible.
Short pole sleeves are combined with clips on the outside of the fly - simply slide the colour coded poles into the appropriate sleeve and clip the rest of the fly on. Pitching the Jannu is when you can really feel the quality of materials used. It's almost as if each component is lubricated with Swedish massage oil; everything slides into place so easily.
Stability of the overall structure is greatly improved by multiple guying points. The poles are on the outside of the fly and strategic guying points have an extended loop that you can wrap around the pole before guying out. This is a pretty nifty feature which definitely adds to overall stability in high winds.
Internal floor space is surprisingly good in a tent that weighs comparatively little. It's certainly more spacious than expected. At 235cm long the inner tent should give enough room for even the tallest user and the internal walls are all fairly steep so usable head room is well utilised. Width is also generous and 3 people could squeeze in if need be.
The total weight of 2.9kg is extremely good for such a stable and relatively spacious tent. 1.45kg each for a party of 2 even compares well with most standard 2 man tunnel tents. The Hilleberg Nallo 2, for example, would be 1.1kg each. The Jannu's design is significantly more stable that a tunnel shape, yet its weight is very low when compared to a traditional geodesic mountain tent.
Minimising condensation build-up means generous roof vents on the inner and the fly which can be closed. The vents are backed with mesh panels to prevent insects getting in and are protected from the elements by a ‘cap' of fabric over the roof. This ‘cap' has guys to add extra stability and extends to a lip over the front door, which stops water from dripping into the tent if the inner door is open for ventilation in bad weather.
The tent seemed to ventilate best when using the roof vents in conjunction with the main door venting. The flysheet does extend all the way to the ground which increases performance, but does limit airflow between the fly and the inner. I did experience some condensation inside the tent, but no more than should be expected in a mountain tent in average conditions.
Porch size is good - there's enough space for a couple of big packs and still room left to cook. Many people find a small porch and/or entrance to the rear to be a useful feature on a mountain tent, but the omission of one on the Jannu does save a little weight, which is fine by me.  The front door is actually asymmetric in shape - helping to keep one side sheltered depending on which way the wind is blowing. There are also multiple zips on the front door which makes getting in and out nice and easy.
As mentioned, with the total weight being 2.9kg, this makes the Jannu one of the lightest mountain tents out there. Both the Crux X2 Storm and Terra Nova Superlight Quasar are similar in terms of weight, but neither quite match the Jannu when it comes to internal space. Both the Crux and Terra Nova models have an extra pole on the Jannu, possibly adding a perceived advantage in stability. However, I think the extra guying points, combined with the Jannu's incredibly high quality of materials, create an equally taut and stable design.
In terms of the fabrics used, Hilleberg use two different types of materials for their flysheets; an ultra light Kerlon 1200 nylon and a heavier Kerlon 1800 nylon. With the Jannu they opted for the Kerlon 1200, which isn't quite as durable as the 1800, but significantly lighter. As the fly is silicon coated, the seams are not taped, but the silicon coating adds strength, water repellancy, and reduces sagging when the fly is wet.
Super strong and super light... the Hilleburg Jannu standing up to the storm.

Conclusion
Overall the Jannu is a brilliant tent that would work for anyone looking for a lightweight product that is suitable not just for alpine climbing and mountaineering, but also 4 season backpacking, in all conditions. In many ways I think the Jannu manages to combine the best properties of a tunnel tent, i.e. good space to weight ratio, with the best properties of a traditional mountain tent i.e. strength and stability. I think the Hilleberg Jannu might be the best combination of strength and light weight at 6.5 lbs, for a dome tent anyway.
Yes it's an expensive bit of kit, but for me the quality of craftsmanship combined with the performance and versatility it offers makes for an unbeatable combination.
Movie: Hilleberg Jannu - Pitching instruction


My knife: A Bernie Garland

My knife
Made by Bernie Garland in England
(woodlore)


How to Make Bark for Backpacking Meals & Snacks


How to Make Bark for Backpacking Meals & Snacks

What is Bark?
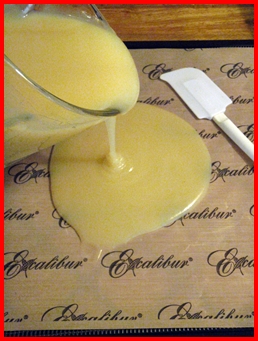
While working on food dehydrator recipes for mashed potatoes, I blended boiled potatoes and broth to a smoothie-like consistency and spread the mixture thinly on dehydrator trays. The potatoes dried into brittle sheets that easily broke into what I call, "Bark."
Potato Bark tasted pretty good as a ready-to-eat snack, especially Sweet Potato Bark, but with the addition of hot water, the Bark reconstituted back into mashed potatoes. I varied the flavor by blending the potatoes with vegetable, chicken, or beef broth.
One thing led to another, and soon I was blending and dehydrating other starchy foods like beans, creamed corn, pasta marinara, and 
pumpkin into Bark.
Why Bark?
  • When you cook and rehydrate Bark with other vegetables and meat, your backpacking meal turns into a thick stew with flavorful sauciness.


  • Because you make Bark from starchy foods high in complex carbohydrates, your hearty meal will power you up the next mountain with calories to spare.


  • Bark makes a great backpacking food because it weighs in at a couple of ounces per serving dry. Ten pounds of potatoes barks down to just eleven ounces.


  • If you run out of fuel or water, you can munch on Bark dry. Bark will reconstitute right in your mouth. Pumpkin Pie Bark goes in like a chip and down like pie!
Step-by-Step Food Dehydrator Recipes

Recipes with Tomato Sauce Leather


Recipes with Tomato Sauce Leather:

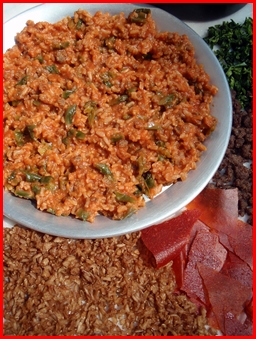
Unstuffed Peppers

Ingredients:
  • ½ Cup dried or instant rice
  • ¼ Cup ground beef, dried
  • ¼ Cup bell peppers, dried
  • ¼ Cup tomato sauce leather, tightly packed
  • 2 Tbsp parmesan cheese
  • 1¼ cups water
At Home:
Pack parmesan cheese and tomato sauce leather separately in small plastic bags. Enclose in a larger plastic bag with rice, ground beef, and peppers. 
On the Trail:
Combine all ingredients except parmesan cheese in pot with water and soak for five minutes.
Light stove, bring to a boil, and continue cooking with the lid on for one minute.
Remove pot from stove and wait ten minutes. Insulate pot if possible. Stir in parmesan cheese before serving.

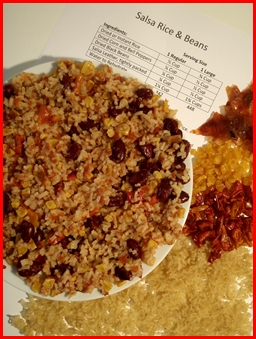
Salsa Rice & Beans

Ingredients:
  • ½ Cup dried or instant rice
  • ¼ Cup dried corn and bell peppers
  • ¼ Cup dried black or red beans
  • ¼ Cup salsa leather, tightly packed
  • 1¼ cups water
At Home:
Cook white or brown rice in vegetable or chicken broth and dehydrate; or use instant rice.

Run salsa through a blender and dry like tomato sauce into leather.

Try mixing green, red, and orange bell peppers for a colorful dish.

Meat Option: Add ¼ cup or more dried chicken and increase water to rehydrate by same amount.

Pack salsa leather separately in a small plastic bag. Enclose with all ingredients in plastic bag.
On the Trail:
Combine all ingredients in pot with water and soak for five minutes.
Light stove, bring to a boil, and continue cooking with the lid on for one minute.
Remove pot from stove and wait ten minutes. Insulate pot if possible.

Seafood Raminara

Ingredients:
  • ½ Cup ramen noodles (half package)
  • ¼ Cup dried shrimp and/or crabmeat
  • ¼ Cup dried vegetables – peppers, onions, mushrooms, tomatoes
  • ¼ Cup tomato sauce leather, tightly packed
  • 2 Tbsp parmesan cheese
  • 1 Cup water
At Home:
Break noodles into small pieces. Pack parmesan cheese and tomato sauce leather separately in small plastic bags. Enclose in a larger plastic bag with noodles, seafood, and vegetables. 
On the Trail:
Combine all ingredients except parmesan cheese with water in pot and soak for five minutes.
Light stove, bring to a boil, and continue cooking with the lid on for one minute.
Remove pot from stove and wait ten minutes. Insulate pot if possible. Stir in parmesan cheese before serving.

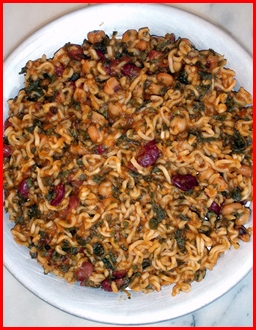
Spinach & Bean Raminara

Ingredients:
  • ½ Cup ramen noodles (half package)
  • ¼ Cup dried beans (any kind)
  • ¼ Cup dried spinach
  • ¼ Cup tomato sauce leather, tightly packed
  • 2 Tbsp parmesan cheese
  • 1 Cup water
At Home:
Cook beans from scratch or use canned beans. There is no need to cook canned beans before dehydrating. Simply drain and dehydrate at 125° for approximately six hours. Beans will split open when dried and will fall apart easily. You can use a single type of bean, such as white beans, or you can mix several different kinds together. 
Dehydrate spinach at 125° for approximately four hours until dry and crumbly. Spinach leaves can start flying around inside your dehydrator when they are almost dry. I cover mine with one of the mesh sheets from Excalibur Dehydrators.
Break noodles into small pieces. Pack parmesan cheese and tomato sauce leather separately in small plastic bags. Enclose in a larger plastic bag with noodles, spinach, and beans.
On the Trail:
Combine all ingredients except parmesan cheese with water in pot and soak for five minutes.
Light stove, bring to a boil, and continue cooking with the lid on for one minute.
Remove pot from stove and wait ten minutes. Insulate pot if possible. Stir in parmesan cheese before serving.

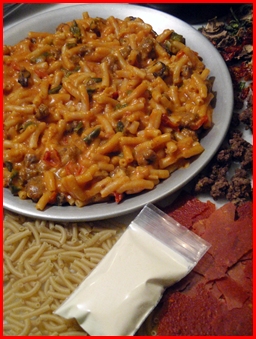
Macaroni with Cheesy Tomato Sauce

Ingredients:
  • ¼ Cup ground beef, dried
  • ¼ Cup mixed vegetables, dried (onions, peppers, mushrooms, tomotoes)
  • ½ Cup macaroni
  • ¼ Cup tomato sauce leather, tightly packed
  • 1 Tbsp + 1 tsp cheddar cheese powder
  • 1 Tbsp powdered milk
  • 1½ Cups water
At Home:
Combine cheese powder (from the mac & cheese box) and instant dry milk in a small plastic bag. Pack tomato sauce leather in another small plastic bag. Enclose the smaller bags in a larger bag with macaroni, ground beef, and vegetables. 
On the Trail:
Add all ingredients except the cheese/milk powders to your pot with 1½ cups water and soak for five minutes.
Light stove, bring to a boil, and continue cooking for two minutes.
Stir in cheese/milk powder, put the lid back on, and place pot into insulating cozy. Wait ten minutes for the meal to continue rehydrating and cooking. Buon Appetito!